Create a webserver
Using the net module.
I based my study on this.
Creating a server:
To create a TCP server, assign net.createServer() to a variable. The variable becomes the reference to your server.
srv=net.createServer()
Then we start listening to it with net.server.listen([port],[ip],function(net.socket)) , where:
port port number, can be omitted (random port will be chosen);
ip : IP address string, can be omitted;
function(net.socket) : callback function, pass to caller function as param if a connection is created successfully. I honestly don't understand exactly how this function works.
So, after the code to create a WiFi connection (same WiFi chapter), you add the code to start a simple http server, as follows:
-- Setup
wifi.setmode(wifi.STATION)
station_cfg={}
station_cfg.ssid="dlink-2213"
station_cfg.pwd="yourpassword"
wifi.sta.config(station_cfg)
-- Connect to WiFi
tmr.alarm(0, 1000, 1, function() -- Keeps checking if connection is made every second
if wifi.sta.getip() == nil then -- Not connected
print("Connecting to AP...\n")
else -- Connected!
ip, nm, gw=wifi.sta.getip()
print("IP Address: ",ip)
print("Netmask: ",nm)
print("Gateway Addr: ",gw,'\n')
tmr.stop(0) -- Finishes timed check
end
end)
--------------------------------
-- START A SIMPLE HTTP SERVER:
--------------------------------
srv=net.createServer(net.TCP)
srv:listen(80,function(conn)
conn:on("receive",function(conn,payload)
print(payload)
-- Your HTML goes here:
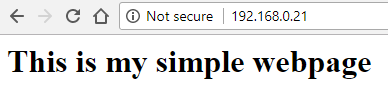
conn:send("<h1> This is my simple webpage </h1>")
-- Add more commands here:
end)
conn:on("sent",function(conn) conn:close() end)
end)
Open a browser and type in the IP address that was printed in the console when you ran the program. You should see:
Adding a text field and a button to your page:
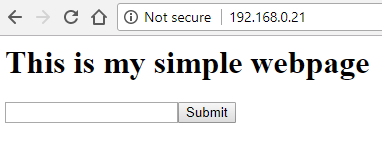
Add the following two lines of code after the -- Add more commands here: comment:
conn:send('<form action="" method="POST">\n')  -- this command creates an interactive form
conn:send('<input type="text" name="myfield">')
conn:send('<input type="submit" value="Submit">')
Reset your board, send the script to the NodeMcu board and refresh your page on the browser. Now your webpage should look like this:
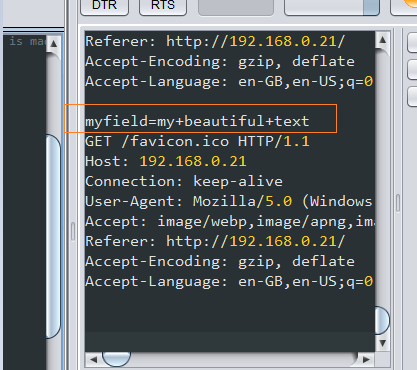
Type "my beautiful text" in the text box and click on the Submit button. Look at ESPlorer console, and you will see that a few lines of information were send from the webpage (they were printed because of the print(payload) command). The very first line has your text in it.
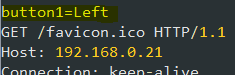
Using many buttons:
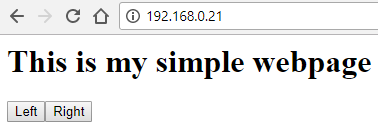
Now change those lines after the -- Add more commands here: to:
conn:send('<form action="" method="POST">\n')
conn:send('<input type="submit" name= "button1" value="Left">')
conn:send('<input type="submit" name= "button1" value="Right">')
Reset your board, send the script to the NodeMcu board and refresh your page on the browser. Now your webpage should look like this:
When you click one of those buttons, you get it's "value" as that first line in the console.:
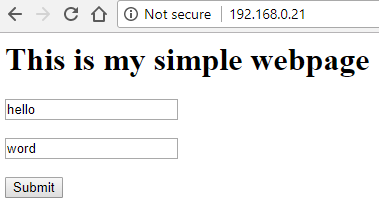
Getting input from many text fields:
Now change those lines after the -- Add more commands here: to:
conn:send('<form action="" method="POST">\n')
conn:send('<input type="text" name="myfield1"><br><br>')
conn:send('<input type="text" name="myfield2"><br><br>')
conn:send('<input type="submit" value="Submit">\n')
Your webpage should look like this after you fill the text fields with text ("hello" and "world" in this case):
And when press "Submit" or the "enter" key, this should show in ESPlorer console:

I'll study how to extract this data at the Getting data from webserver chapter.